Adobe Premiere Pro CC has become the dominant video editing software for professionals and enthusiasts alike, trusted by creatives including YouTubers and filmmakers alongside options like Final Cut Pro, Sony Vegas Pro, and iMovie. Recent updates such as workflow enhancements, AI-powered audio clean-up, and simplified colour grading provide both new users and experienced editors the tools to create stunning videos quickly and efficiently.
This comprehensive guide, optimised for 2023, focuses on setting up an efficient video editing workflow using Premiere Pro CC’s industry-leading non-linear editing system. The tutorial covers layout features like menus, preferences, windows, markers and labels. It also details how to leverage Premiere’s capabilities to simplify editing and publishing eye-catching videos.
Table of Contents
The Premiere Pro CC Menus
At the top of the screen, you will see a number of drop-down menus. These are all labelled File, Edit, Clip, Sequence, Markers, Graphics, Window and Help. If you’re familiar with other types of software, such as PhotoShop, Microsoft applications such as Word and many other applications, you’ll have seen similar in the past.
Within the file, you will find options such as ‘new’, which will show another drop-down to create a new project, a new bin and a new sequence among other options. You can also import and export from files, save your documents and open previous projects.
Edit is another drop-down with options. Within edit, you have options to undo and redo the previous step, copy & paste, duplicate and much more. Edit has much more to do with a project.
Preferences are also within the edit. With preferences, you can edit the look of your Premiere Pro CC as well as how the audio works, the auto-save, graphics and much more.
Labels and Markers Within Premiere Pro CC
Premiere Pro CC also offers great tools to help the users organise themselves. One way they do this is by the use of labels. Within the projects window, you can choose different files and colour-code them. To do this, select the files you wish to label, right-click, then head to label and choose the option you wish.
Labels are very helpful in the long run when creating a longer project or film. For instance, you can label your audio files a certain colour to your video files. Alternatively, you can also label files. This means you can label clearer videos or audio.
By clicking M, when on your timeline, you can create markers. When a marker is created they go over to the projects tab within Premiere Pro. When over in this tab, you can comment why you have chosen this part of the video for a market. For example, if you don’t like the scene or the video is a little over-exposed, you can comment this within the marker. These are great for directors. When you click on a market within projects, you will then be brought to that scene quickly.
You can also create markers within a certain clip, as the markers before are within the sequence. To do this, highlight the clip and click M, just like before. You can then comment on the clip as well, to help you in the future.
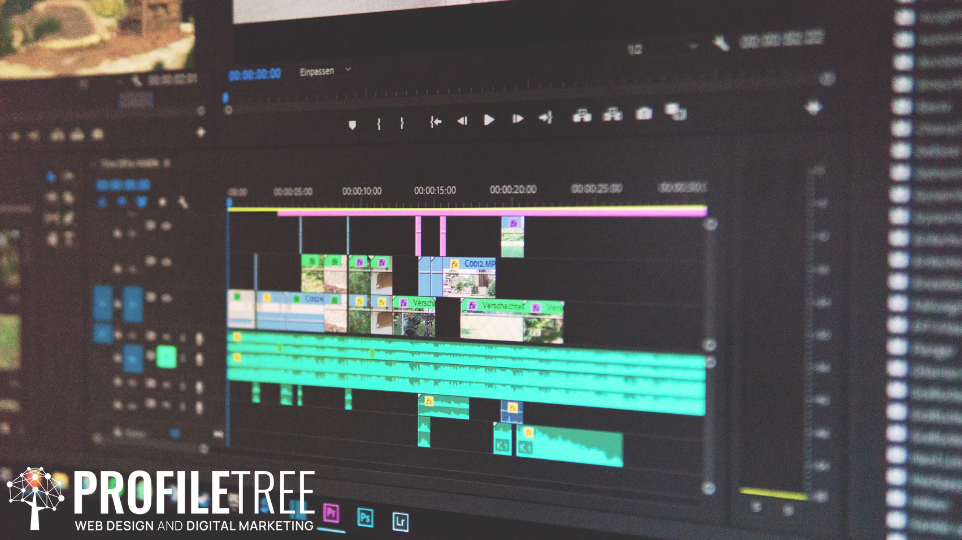
The Layouts Within Premiere Pro CC
One of the most useful features of Premiere Pro CC is the ability to customise layouts for different parts of the editing workflow. When you first open Premiere, you will be in the standard Editing layout. But customising other layouts can greatly speed up your editing:
- Assembly Layout:
- Purpose: Useful for the initial stages of editing when you are reviewing footage, marking selects, and stringing clips into a rough sequence.
- Features: Provides more screen space for large viewing panels.
- Guide:
- Import your footage into Premiere Pro.
- Create a new project or open an existing one.
- Select the Assembly layout from the workspace bar at the top of the screen.
- In the Project panel, organise your clips and media assets.
- Drag and drop clips from the Project panel into the timeline to create a rough sequence.
- Use the Programme Monitor to review your sequence and make basic edits.
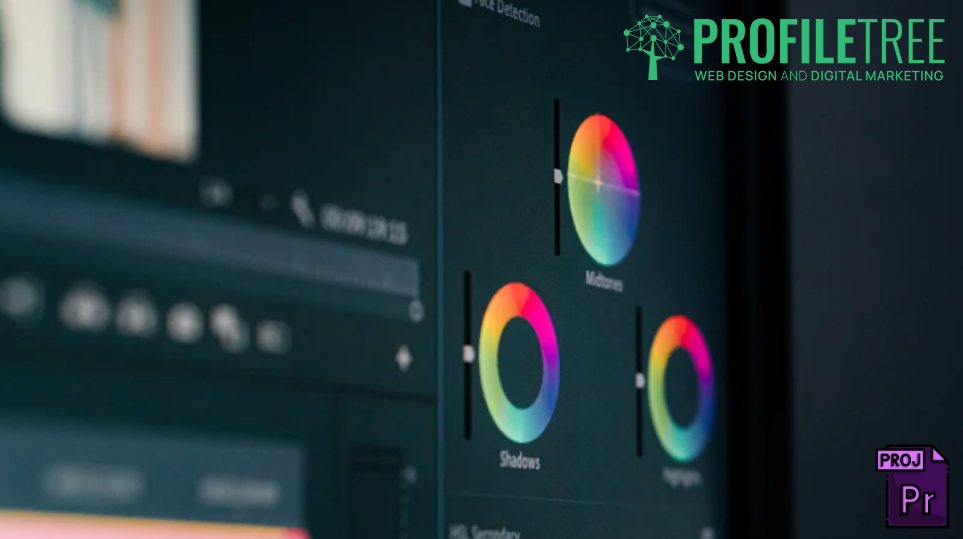
- Colour Layout:
- Purpose: Specialised panels for using Lumetri Colour and colour correcting your footage without switching back and forth from the edit timeline.
- Features: Includes a larger viewer, curve adjustments, and vectorscope displays.
- Guide:
- Select the Colour layout from the workspace bar.
- Import your footage and add it to the timeline.
- In the Lumetri Colour panel, you can adjust various parameters like exposure, contrast, saturation, and more to correct and enhance your video’s colours.
- Use the waveform and vectorscope displays to analyse and fine-tune your colour corrections.
- Utilise the curves adjustments for precise control over colour and exposure.
- Effects Layout:
- Purpose: Focuses the interface on applying and modifying visual effects in your edits using tools like keyframes and effect presets.
- Features: A more spacious timeline for fine-tuning the start/end points and stacking order of effects.
- Guide:
- Choose the Effects layout from the workspace bar.
- Import your footage and add it to the timeline.
- In the Effects panel, you can search for and apply various video and audio effects to your clips.
- Use the Effect Controls panel to adjust effect parameters and set keyframes for animations.
- Arrange and stack effects on clips in the timeline for the desired visual impact.
- Audio Layout:
- Purpose: Optimises Premiere specifically for audio mixing needs.
- Features: Expands the track mixer panel and gives you quick access to common mixing tools like EQ and Compression.
- Guide:
- Select the Audio layout from the workspace bar.
- Import your audio clips and add them to the timeline.
- In the Audio Track Mixer panel, you can adjust audio levels, apply EQ and other audio effects, and control panning.
- Use the Essential Sound panel for automatic audio adjustments based on your project’s requirements.
- Fine-tune audio using the timeline’s audio meters and waveform displays.
- Graphics Layout:
- Purpose: Adds panels that facilitate creating titles, captions, lower thirds, and other graphics.
- Features: Includes a Graphics panel for organising text styles, backgrounds, and assets.
- Guide:
- Choose the Graphics layout from the workspace bar.
- Access the Graphics workspace to create and edit text and graphic elements.
- Use the Graphics panel to manage text styles, backgrounds, and other graphic assets.
- Drag and drop graphics onto your timeline for overlaying on your video clips.
- Customise the appearance and animation of graphics using the Effects panel and keyframes.
Using layouts means you don’t have to clutter a single screen when really focusing on specialised tasks like colour grading. Customising to optimize for the task at hand speeds up work by minimising digging through menus and windows.
Comparing Premiere Pro CC’s Workflow to Other Non-linear Editing Tools
While Premiere Pro CC has become an industry-standard video editing tool, platforms like Final Cut Pro, DaVinci Resolve, and Avid Media Composer have their own advantages and best use cases:
Final Cut Pro:
- Seamless integration with the Apple ecosystem from iPhone, and iPad to Mac makes transferring footage simple.
- Magnetic timeline enables fast precision editing by easily keeping clips and audio in sync.
- Limited format support and lack of 3D editing tools compared to Premiere CC. Best for dedicated Apple users.
DaVinci Resolve:
- Considered best-in-class colour grading tools, used in Hollywood films. More advanced than Lumetri in Premiere Pro CC.
- Includes the Fusion visual effects suite allowing for motion graphics and compositing without needing After Effects.
- The steep learning curve for node-based workflow across edit, colour, Fusion, and Fairlight audio pages.
Avid Media Composer:
- Still the standard for large studio workflows. Allows editors to collaborate on shared projects efficiently.
- Very customizable interface for speed. Professional 3D editorial tools.
- More demanding media management makes it harder for beginners to learn compared to Premiere.
Adobe Premiere Pro CC:
- Familiar with timeline workflow with industry-leading integration of After Effects for graphics and titles.
- Leverages full Adobe Creative Cloud ecosystem including direct usage of Adobe Stock assets.
- Proxy workflows, auto-save, and interface customization optimisation tools increase editing efficiency.
- The breadth of formats, codecs, and languages supported is unmatched. Ideal for individuals rather than studio pipelines.
In summary, while alternatives provide their own strengths, Premiere Pro CC has its familiar track-based timeline, deep integration of motion graphics through After Effects and seamless production ecosystem with other Adobe apps making it a versatile, industry-standard choice.
Key Advantages
Clutter Reduction
When you work on video editing projects, especially complex ones, you often have various tools, panels, and windows open to access different editing functions. This can clutter your workspace and make it challenging to focus on a specific task, such as colour grading. Layouts are designed to streamline your workspace by hiding unnecessary panels and tools, leaving only the ones relevant to the task at hand. This clean and organised workspace reduces visual clutter and distraction, allowing you to concentrate on the specific job you’re doing.
Speed and Efficiency
By using layouts, you can instantly switch between different editing phases without the need to manually rearrange your workspace or search for specific tools. This saves you valuable time and reduces frustration. When you’re in a time-sensitive editing process, such as meeting a deadline, these layouts become invaluable. You can transition seamlessly from reviewing footage in the Assembly layout to fine-tuning effects in the Effects layout or performing audio adjustments in the Audio layout, all with minimal effort.
Increased Efficiency
Premiere Pro CC’s specialised layouts allow editors to customise and save multiple interfaces tailored to specific video editing tasks:
The Assembly layout provides more space for viewing and sorting bulk footage before editing. The Colour layout surfaces advanced LumetriScopes and curves for colour grading without cluttering the timeline. The Audio layout expands the track mixer and effects rack for more advanced mixing. By instantly switching between layouts optimised for each stage of production, editors eliminate wasted time and clicks navigating scattered menus and panels.
Enhanced Focus
Each layout is tailored to a specific editing task, such as colour grading, audio mixing, or effects application. When you switch to a particular layout, it optimises the arrangement and visibility of tools and panels related to that task. For example, in the Colour layout, the Lumetri Color panel and relevant scopes are prominently displayed, making it easy to access and control colour grading tools without navigating through multiple menus.
This specialised focus ensures you have everything you need at your fingertips for efficient and accurate colour grading.
Greater Ease of Use
As well, as tailored shortcuts, docks, and snapping match interfaces to personal editing preferences, improving comfort and software mastery over time.
Customised shortcuts, docks, and snapping options contribute to a more comfortable editing experience. When your editing tools and workflow are aligned with your preferences, you’re likely to feel more at ease and confident while working in Premiere Pro. This comfort can lead to increased productivity and a smoother editing process.
Minimising Menu Navigation
Traditional video editing software often requires you to navigate through menus and submenus to access various features and tools. Layouts eliminate much of this menu digging. For example, instead of navigating through menus to access colour correction tools, the Colour layout brings those tools directly to your workspace. This reduces the number of clicks and keystrokes required to perform specific tasks, making your editing workflow more efficient.
Customisation and Personalisation
In addition to the predefined layouts, Premiere Pro CC allows you to customise and save your layouts based on your specific preferences and project requirements. This level of personalisation empowers you to create an editing environment that suits your unique workflow and style. Over time, you can refine these custom layouts to further boost your efficiency and comfort while working in Premiere Pro CC.
Potential Drawbacks
Disrupted Workflow
Frequent layout switching can temporarily disrupt preview and source clip viewing, which is important for maintaining editing context and flow. Some loss of continuity is inevitable when interfaces rebuild.
Saving and remembering context, such as playhead positions before switching, can help overcome this.
Loss of Continuity
The transition between layouts can result in a brief loss of continuity, making it challenging to maintain a seamless editing experience. For example, if you switch from the Effects layout to the Colour layout, you may need to reposition panels and adjust settings, which can slow down your progress.
Complex Customisation
With customisable appearances, docks, shortcuts, and workspaces per layout, optimising each to an editor’s unique taste can be time-consuming upfront.
Leveraging Adobe presets and templates helps mitigate complexity for beginners while allowing custom tweaks over time.
Time-Consuming Customisation
Premiere Pro CC offers extensive customisation options for its interface. While this flexibility is a strength, it can also be a drawback for users who are new to the software or those who prefer a simpler, out-of-the-box experience. Optimising each aspect, such as appearances, docks, shortcuts, and workspaces, to suit an editor’s unique taste can be time-consuming and may require a learning curve.
Learning Curve
For beginners, the abundance of customisation options and settings in Premiere Pro CC can be overwhelming. It may take some time to become proficient at tailoring the software to your needs, potentially delaying your editing projects.
Adobe Presets and Templates
To mitigate the complexity of customisation, Adobe provides presets and templates that offer preconfigured layouts and settings for common editing tasks. These presets can be especially helpful for newcomers, as they provide a starting point for organising the workspace and tools.
Gradual Customisation
Users can gradually customise Premiere Pro CC to their liking, rather than attempting to configure everything at once. This approach allows you to become comfortable with the software’s features over time and make adjustments as you gain experience.
Frequently Asked Questions (FAQ)
Q: How do I create a custom layout in Adobe Premiere Pro CC?
A: To create a custom layout, go to the “Workspace” menu, and then select “New Workspace.” You can then tailor the panel arrangement to match your preferred editing workflow.
Q: Can I save multiple custom layouts in Premiere Pro CC?
A: Yes, Adobe Premiere Pro CC allows you to save multiple custom layouts to cater to various parts of your editing process, such as editing, colour grading, and audio mixing.
Q: How can I switch between different layout workspaces in Premiere Pro CC?
A: You can easily switch between your saved custom layouts without the need to rearrange panels each time. Simply use the “Workspace” menu located at the top of the Premiere Pro interface.
Q: What’s the distinction between projects and layout workspaces in Premiere Pro CC?
A: Project files in Premiere Pro CC contain references to your media assets and edits made in your video sequences. Layout workspaces, however, are configurations of panel arrangements designed to optimise screen space and improve your editing efficiency. They don’t alter the underlying project content.
Q: Is it possible to sync my custom layout preferences across different computers in Premiere Pro?
A: Yes, you can export your custom layouts as .pset files from one computer and then import them into another. This feature is useful for maintaining a consistent editing environment across multiple computers.
Q: Why are some panels missing in my custom layout in Premiere Pro CC?
A: If certain panels are missing in your custom layout, it’s likely because you removed them using the “X” icon during layout customisation. To make those panels visible again in that workspace, you’ll need to re-enable them through the main “Window” menu.
Q: How can I optimise video playback and handle effects efficiently in Premiere Pro CC?
A: For smoother video playback and efficient handling of intensive effects, consider using the “Effects Layout” in Premiere Pro CC. This layout is specifically designed to provide more timeline space for arranging effect stacks and keyframes, enhancing your editing experience.
Conclusion
In conclusion, Adobe Premiere Pro CC is a versatile and industry-standard non-linear editing tool. It empowers users to optimise their workflow, enhance efficiency, and personalise their editing environment. While there may be some challenges, such as a learning curve and potential workflow disruptions, the benefits of customisation and layout options make Premiere Pro CC a top choice for video editing across diverse project needs. With its continually evolving features and capabilities, it remains a go-to solution for professionals and enthusiasts alike in the ever-evolving world of video production.
 ProfileTree