Website Builder
Why use a WIX website tutorial? WIX is a superb online tool which provides stunning, responsive websites using a code-free front-end technology. This allows users to build a website without website creation experience.
The beauty of WIX is that it is a free method of creating a website. This applies whether you’re, for example, a photographer wanting to make an online portfolio or business owner wishing to expand and upgrade your business online. You’ll find a tutorial below from ProfileTree’s YouTube channel.
This blog post will also help with a clear, but in-depth look at the process of making a WIX website.
Table of Contents
WIX Website Tutorial: Logging In or Signing Up to Wix
This is the first step to creating a website with WIX. Without an account with the web builder, you won’t be able to make a website.
Signing up to WIX is easy and very simple. The easiest way to sign up to WIX is using an existing social media platform you have already signed up to. You have a choice between Facebook or Google. It is recommended that you use accounts linked to your business or online social media page.
If you don’t want to use social accounts, you can directly sign up using your email. To do so all you need is an email and set a password. Once signed up it will then take you to the next stage of either starting with WIX Editor or WIX ADI.
Before Getting Started on WIX
Before anyone gets started with building a website, and this goes for all web builders including WIX, you should have brief and an idea of the finished product.
First of all, you should know what your website will be about. This is the topic of your website. When starting to build a website WIX actually asks you this question, to suggest themes suitable towards your idea. You should also have an idea of what content is needed for the website. Is the website built on images, if it is a photography blog? Or/and, will you need an about page for example?
Also before getting started, you should do research into your idea. Will you have competitors online? Do they do anything on their website which you like? One final thought would be, do they have the right content?
This research will give you an idea of how you will complete the development stage and not going into the build blind.
You should also plan your website before getting started. This means you should have an idea of the colours of your website. You should also know what pages you will need and if you need specific features such as a gallery, a subscribers section or any type of form. If you already have a logo, the colour scheme should compliment this.
By the development stage you should know and have an idea of what your website will look like, what audience it will attract and if it will involve all the features appropriate.
Starting With WIX Editor
The WIX editor is just one of the ways a user can start to build a website with WIX. The other being WIX ADI, which seems to being phased out.
Once a user clicks to start with WIX editor, the user can choose from a large range of templates available for a site. They relate to a lot of categories, such as E-Commerce, Design and even a Portfolio type of theme. You can also use a blank template and start from scratch.
Before starting your build, a user should know about all the different elements the editor offers. These elements will be essential for your build on the WIX editor and without these building your website on the editor just wouldn’t work.
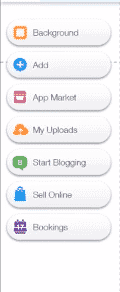
The Elements
Each theme comes with different elements. For example, if your theme has a blog or a booking form within it, you will find these elements at the side, to get started with.
Background-
In the background element users can of course change the background of their site on whichever page they’re on. Users can use images from WIX or their own uploaded images as well as videos for the background. The user can also choose the colour palettes provided by WIX and have a solid colour as a background.
Add-
The add element is the building block off your website. All the options in the add element will be everything you need to build your website.
App Market-
Another element which is great in WIX, is the app market. This allows users in WIX to add add such a social media, apps for an online store and much more. These apps will make your site work to its full potential. There’re even apps for making bookings at hotels and restaurants.
My Upload-
My Upload is another element in WIX. This is where users of WIX can add images, vector images, videos, fonts and other documents.
Start Blogging-
The start blogging element allows users to start their blog on their site. Here you can manage or upload a new post to your site. Posts can be about anything on your site, but ideally, they should surround the topic of your site. For instance, if your site is a photography portfolio with a blog, ideally posts will be about your experience taking photos and even about the equipment you use.
Sell Online-
If your site has a sell online element you can start to sell products on your site almost instantly. If your site doesn’t have this element you can get it by the app market.
Bookings-
With the bookings element, users can start to take bookings on their site as soon as their site is published. Again, if your does not have this element, you can find it in the app market. With this element, you can manage booking’s and add new services to your site.
Pages-
Within the page’s element, users can manage their pages as well as add new pages. All of these pages will come together to make your website.
Site Settings-
Site settings are almost more important than any other part of the website. Without these settings your site won’t be published (If you don’t want a WIX domain) or be able to certain other elements to your site. Here you will find where to connect your sites domain name, if you would like your own. You will also where to add your sites favicon, a professional mailbox, analytics and much more.
Toolbar-
The Toolbar element is another element which is great. You will find a toolbar, rulers, grid-lines and snap to objects. These help users build their websites. Grid-lines help you arrange your websites in a nice layout. The snap to objects is a great part of the tool’s element. This helps users place objects and apps on their website easily. It uses the grid-lines to snap the objects to edges.
Shortcuts-
Shortcuts are needed to make building a website more efficient. Shortcuts you can find within the WIX builder are, a shortcut to a mobile version of the site, preview, save and publishing your site.

Templates
Before getting started with your site, you need to choose a template, whether it is a WIX template or a blank template. Ideally if you want to build a quick website for yourself, you can use one of the many templates/themes available.
With the blank template, you can build your site from scratch. This allow users to build there site to how they want it to look and not to how a template already looks.
Starting Your WIX Build
Once you know all what you can do with WIX, it is time to start your build. One of the first parts of your website design should be the page design. To do this, all you need to do is double click the page you’re working on and the page design box should appear. If it doesn’t click on the ‘Change Page Design’ bubble. It should automatically show instead.
This will start to set the colour of that part of the page. Just click the right colour for you. To set the background of the rest of your page. Click on the background element. Here you can choose a colour for this or even add an image. To add an image, click on the image button within the background element.
You will see many images from WIX, or you can add your own. The WIX images are usually free to use. You can upload an image from here or use one of your already uploaded images. This is how to upload an image for everything.
WIX also has its own search for images. Here you can find ideal images for any part of your website. You can also upload a video within the background settings. Other settings within the background settings include different effects such as the scroll effect as well as the opacity of the image.
Adding a New Section and Navigation to Your WIX site
The next step to building your site, is to start off with adding navigation. Navigation is essential to a multiple page site. To add a navigation, a user needs to go to the add element and go to menu within this element. (Navigation is technically a menu).
Once in the navigation, you can choose between many different styles of menus. Once you choose the navigation you would like, WIX will automatically include each of your pages within the navigation bar. To place on your page, just drag and drop. Once on your page, you can fix to the whichever size you would like. Big or small, it is up to you. Also remember to place within the header of the page, as the navigation will then show on each page of your site.
To manage your navigation, double click on your menu. The same bubbles as before will show. Here you can design your navigation to whatever you would like. This includes the colour of the menu, the text of the menu, the layout and much more.
The add button is also how a user can add a new section. Ranging from added buttons, lists, even a blog and much more. Experiment with your site. Always to remember to preview your site also, as it might look slightly different from the editor. This way you can see if the site works for you and matches your ideas.
Adding a Title In WIX
Similarly, to adding a navigation, to add a title, you again go to the add element. Many sites nowadays use images of logos/names as the title. To do this, in the add element go to add image. Again, you can add free WIX images as well as your own. Drag and drop whichever image you want and move and stretch to the right size for you.
If you don’t have or want an image for a title, you can alternatively use text as a title. Just go to the add element and add text. Choose whichever style is for you, change colours, alignment and much more. When in a box, you can always attach images and text to the box. This will mean the image/text will move along with the box if it is moved.
How to Add a Slideshow to Your WIX Site
Similarly, to adding most features to your site in WIX. To add a slideshow, a user needs to go to the add element and then slideshow in the element. You will see a range of slideshows to choose from and when you find the right one, just drag and drop.
On the slideshow you will get the option to manage the slides. To edit the images o your slide show, click through the slides and choose slide background. You can choose from your own library of images, WIX’s own and even set it as a colour. Different slides will also have different features within them such as boxes and buttons.
In the background settings of the images, always use scale to fit unless you want it otherwise. You can also choose for the slideshow to auto play, how long a slide shows for and other options.
The buttons/arrows which users can use to move from slide to slide can be edited also within the settings. These can be edited to match your websites theme. An animation can be set for the slideshow. This is how the slides come into view. Most animations are a bit crazy and swirl into screen whereas some are more professional and come into view gently and appropriately for a professional website. To edit any text on the slideshow, just double click on any text. Buttons can be direct to other pages of the website or other websites, both using a URL/web address.
Adding a Fade-in Section to Your WIX Site
What is a fade-in section? A fade-in section on a website is a section of a web page which fades into view the further you scroll down. Making a website look more presentable and professional in most cases.
It is very easy to make a fade-in section on your site. Again, go to the add element and add a strip. You can choose from a classic strip or a designed/themes strip. Double click on the strip and click settings. You can change the opacity of the strip. You can also use an image here instead.
Here within the settings you will find a fade-in button, click on this and your section will now fade-in. If you have a themed or custom strip, you may need to double click and edit each individual part of the strip to fade-in, otherwise some parts of the strip will fade-in and others won’t.
How to Delete on WIX
It is very easy to delete within WIX. WIX uses the back-space button on the keyboard to delete. Simply click on the section of text, box or strip to delete and hit backspace. This is the exact same as other application such as Microsoft Word/PowerPoint and Adobe Photoshop/Illustrator.
You can also double click on the section and to delete have the tools opened from above. When a section/feature is double clicked, the delete button, a trash can/bin should be able to be pressed. When this bin is pressed, the section will delete.
Adding an About Section and a Button to Your WIX Site
Almost every site needs an about section. Without this section, no one will understand what your business or goal is for yourself and your website. With the about section it can make users feel more comfortable with your website and feel more connected.
It is very simple to attach an about us section to your website. If you are using a template it is even easier but if not, use appropriate columns, strips and images to match your site and give your about us page a bit of a more professional look. Add text to the page using titles and paragraphs.
For the content of the page, it is recommended to have this prepares before building your page and your website to be honest. This allows the user to build the website easily and much quicker without needing to inset content on the spot.
You can also add buttons to other pages within your site. It would be good to add a button under descriptions within the about us page/section. Choose a button which is consistent with your site and add a link by editing the button. Ideally a button in the about section would like to a portfolio or blog of some kind.
Adding an Our Services and Gallery
Adding an our services to your site is quick and easy. You could make a complete separate page for the services or a section within some of your pages. To add a page or a section, it is done just like before. Go to the add element and click on box or strip to add a new section to a page or go to the menu and page element to add a new page. Remember to name your page appropriately.
Similarly to adding almost anything to your site, to add a gallery, you use the add element again. Each gallery you will see will be different from each other. From professional looking galleries to the less so professional. Wherever you choose to place a gallery on your site, always make sure the images are appropriate for the page or your website.
A perfect example would be a photographers portfolio website. They may have different pages for different types of photos such as nature, cars even maybe something small such as street signs. Having a car page would mean, no images of nature should be in the gallery of the car page, unless the photo over laps each category. Then the photo could be an exception.
Once you have chosen the right gallery for you, start to manage the images within the gallery. If you already have images on your site, this shouldn’t take too long.
Adding Social Media Links and Google Re-Use Images
Every site needs social icons within it. Without the links search engines may not recognise the link between your social media accounts and your site. It also means users of your site can easily go to your social media by the click of a button.
To add social icons, you can simple use WIX free icons or icons from Google. To get icons from with, simply go to the add element once again and click on social. You will see the many icons including Facebook, Twitter, Google+, Instagram, Pinterest, YouTube and many more. Just drag and drop these icons from the social add element to the right part of your page.
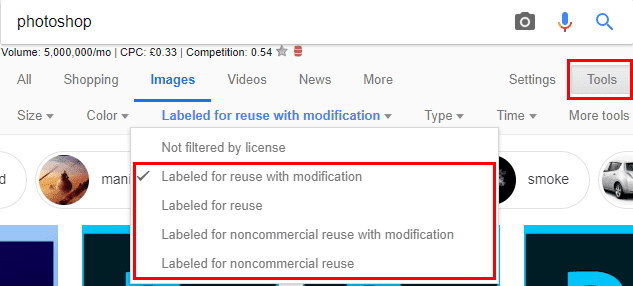
Users can also use search engines such as Google to find images for your site, including social icons. One thing to always remember is copyright. Not every image on Google Images is subject to copyright but most are. Some images may be allowed for non-commercial re-use and others may not be labelled to re-use commercially. Some you may not be allowed to re-edit yourself. You should always watch out for this.
On Google you can get around this by clicking on tools and changing the usage rights. This filters images a user can use on their site.
Once you have images labelled for re-use and re-edit you can then edit them appropriately for your site. Also remember to save an image from google in an appropriate format. This could be JPG or PNG.
Editing Images for Your WIX Site
Once you have images of Google, copy-right free or labelled for re-use of course. You may need to edit them. Photoshop is recommended to edit images but there’re a few other applications you could use such as Gimp or Paint.net.
Depending on your site, you may need to change the size of the logos you have in your library and even the colour of the logos to suit your theme. If you download an image with all the logos you need on it. The process seems to take a bit longer.
- To start open the image on Photoshop.
- Next use the rectangle marquee tool and draw over whichever icon you need.
- Open a new canvas/document. (File —> New)
- Copy (CTRL + C) image in rectangle and paste onto new canvas. (CTRL + V)
- Free transform/transform image (CTRL + T or Edit —> Transform)
- Use the shift key when moving to size, so the image keeps the same shape and quality.
- If the image has a background, use the Magic Ward tool, click on all the background and use the delete key. Also can use the eraser tool.
- Then save image and repeat for other logos needed.
To change the colour of the image, use the magic wand tool on all parts of the needed image and use the paint brush tool to paint over. This is ideal if you want to the logos to match your theme. (See example below)

Adding More Pages (Such as a Contact Page) on Your WIX Site
Every site needs a section or a page for users to be able to contact the owners/editors of the site or company. This page should contain all the social media links, so that users can contact the company through social media. There should also be a form which users can also use to contact.
The form should include many fields such as a means to contact the user back directly whether its a email or phone number, a name and a reason for contacting the company using the form. This could be a message to say something good or it could be a complaint or constructive criticism. All which help the site and company grow in the future.
Other pages to be included on your site, should be appropriate for the site.
How to Use WIX ADI
WIX also offer WIX ADI which is a second site editor. It works by asking the user a number of questions. It then uses the questions to help build a site before your eyes. The ADI uses artificial intelligence to build a site automatically for you.
The ADI, creates an attractive website which is unique to you with optimal design. The questions it asks are all about what kind of website you’re looking for and your needs.
After the questions are answered, you can add a logo, social media links and personal information of the site. You will then get shown a number of themes and just choose the right one for you. Now its just a waiting game, as the ADI is making your site automatically.
Just like the WIX editor, you can change and customise anything on your site. You will probably find some changes you would like to make and ADI is perfect as it allows you too. The only difference is, if you want to change a part of the site, all the information shows in a column to the left of the screen. This can make your use of the ADI much quicker and get your website published as quick as a possible.
Adding a Blog to Your WIX Site and How to Use It
Every modern website tends to have its own blog. Blogs can be anything from an article base with a range of topics, news and even articles about the website/business/company. Everyone has one. The ProfileTree blog is filled with everything online, from Digital Marketing articles, to Web builders to the next big technology trend.
To add a blog to your WIX site it is very simple. There is a specific element to add your blog to your site. Depending on your theme. To manage your blog, go to your blog manager and from here you can easily add a new blog post. Titles should be engaging to draw readers in and you usually can set an author.
In the body of the blog images and text can be added. You can also add your post into categories, which help to separate blogs into specific folders. This is due to people being interested in different blogs. Tags can also be added, which help with SEO. Once you’re finished creating a blog post, publish the post to your site.
Just like other elements within your pages, the blog can be easily edited. This includes the colours of your blogs, the layout and the design.
Hosting, Domains, SEO and WIX Premium
SEO with WIX SEO Wiz
The basics of SEO are very important to comply with. They help search engines understand your website and what it is about. Using algorithms search engines will then rank your site appropriately to specific searches. Ideally you want your site to be on the first page of a search, which can be very hard. Generally the basics of SEO does not achieve first page ranking as it requires a bit of work and effort to do so.
On WIX there is a wonderful SEO tool called SEO Wiz. It makes the basic steps of SEO even easier by offering you suggestions, such as keywords which relate to your website. Once you set your keywords the tool allows you to analyze the keywords. Have a mixture of short-tail and long-tail keywords, as long-tail keywords are easier to rank for. The tool then offers you an SEO plan, which will hopefully start to rank your website.
Adding a Domain and Hosting to Your WIX Site
With WIX, you also get a free domain. The main problem with this domain is that ‘WIX’ will be attached to the address. This is bad for search results and your website, if you want it to be successful. Therefore you would want to buy your own domain an connect it to your website. Names can be expensive, especially premium names. This would involve country codes such as ‘.co.uk’ and ‘.ie’ a lot as well as short-tail keywords such as cars or amazing cars.
WIX also offer free hosting. Along WIX hosting, WIX adverts will be on your site if you choose to host with WIX. To change this you will need to upgrade your WIX plan to a premium plan. Great hosting companies include GoDaddy, BigWetFish and many others.
Upgrading to WIX Premium.
Once you have upgraded to WIX premium you will see no adverts on your site. You will also get access to Google Analytics, which is another great way help your site rank in search engines. Your hosting and domain can also be connected when you upgrade to premium.
You can then publish your site once the hosting and domain is all set up.
Unmissable reading from ProfileTree… Top Social Media Sites | Understanding Google| Emoji Domains- Are they relevant? |WordPress SEO with Yoast: Ultimate Guide | Google Maps Features: Tips and Tricks | Types of Augmented Reality
Is WIX Better Than WordPress?
The great thing about WIX and WordPress, is they can both be free if you use WordPress.com. Both offer great features, ease of use, great design, support and pricing, if you use paid plugins or apps.
The main difference between WIX and WordPress is WordPress.org. WordPress.org offers a great service to build bigger websites, so in some cases WordPress will be better than WIX.
How Much Does WIX Cost?
WIX is one of the largest website builders in the world. Therefore, you may be surprised it is a free service. If you would like to have a more professional website, you may need to purchase different features including a domain name, apps for your site and priority support.
Apps can range from forms, applications for an online store, business tools and much more. These could make or break your site.
Is WIX Good for E-Commerce?
WIX have many features and apps for E-commerce. Depending on whichever template a user uses, E-commerce may already be in use. Users can also add E-commerce to their site using the app market if their template doesn’t already have it.
Therefore, WIX can be good for E-commerce if you can use it correctly. It can also cost to have E-commerce on a WIX site depending on different apps a user uses.
Can I Earn Money From WIX?
Yes! You can earn money from WIX. Depending on what your site is, you can earn money. For instance, you can make an E-commerce site on the web builder. Selling products is the main way users can earn money from WIX.
Having your own domain is also very helping to earning money, as your site should rank higher within search engines.
Other ways to earn money from WIX include advertisements on your site. These will be your own adverts and not WIX adverts, so you would need a premium account on WIX. Blogging, drop-shipping and marketing are other ways to earn money from WIX.
Does WIX Have Support?
The main way users can get support from WIX, is phone support. They offer phone support in three of the world’s main languages. They’re English, Portuguese and Spanish.
WIX also have a help centre, where users can find help for many different problems, ranging from setting up a blog to how WIX billing works. It is basically a large FAQ’s centre. You can also find help on the many social media accounts WIX have. They create and share useful articles, which can help their users out.
Good luck!
More Unmissable WIX Videos from ProfileTree… WIX Tutorials for Beginners- E-Commerce Site | WIX ADI vs WIX Editor| How to add a Blog to your WIX Site? | WIX E-Commerce Set-up | How to Create WIX Affiliate Advertising | How to add a Booking Page to your WIX Site
Even more WIX Videos… How to add Music to your WIX Site | How to edit a Website in WIX | Uploading a Font to WIX | How to make a Free WIX Site in 1 Hour | How to add a Domain to your WIX Site | Build a WIX Website in under 4 Minutes | Using WIX ADI to build a WIX Site
Let’s talk results!
Start improving your website, optimizing your digital marketing strategies and increasing your sales.
 ProfileTree
 Rahma Ali // 14th April 2024
 Marwa Alaa // 22nd April 2024
 Noha Basiony // 22nd April 2024