How to integrate Wix and MailChimp?
Why take time to understand how to integrate Wix and MailChimp? Well, Wix offers so much potential and is so easy to use that it pays to ensure you get the most from this powerful tool.
Almost anyone can use WIX, especially with help from the likes of YouTube tutorials and WIX support, such as forums and the WIX help centre. Very little technical skill is required to make a professional website.
At ProfileTree, our web design service includes WIX web builds, as well as sites using other tools like WordPress.
That’s why we’re proud to offer free guides to using both platforms. In the video below, we explain how to import and export contacts on WIX, what contact labels are on WIX and how to use MailChimp to connect to your WIX contacts more effectively.
Table of Contents
How to Add Contacts to Your WIX Website
We’ll start with importing and exporting contacts.

Importing contacts into your WIX site is easy. First of all, you need to know how to access your contacts within WIX. You need to be signed in to your WIX account to access this. Once signed in, you will see a dashboard like the one below.
Within the dashboard, you will see a left-hand sidebar that includes features such as a blog, if you have one, marketing tools, and settings. Contacts & CRM are also found here. Check out this example below.
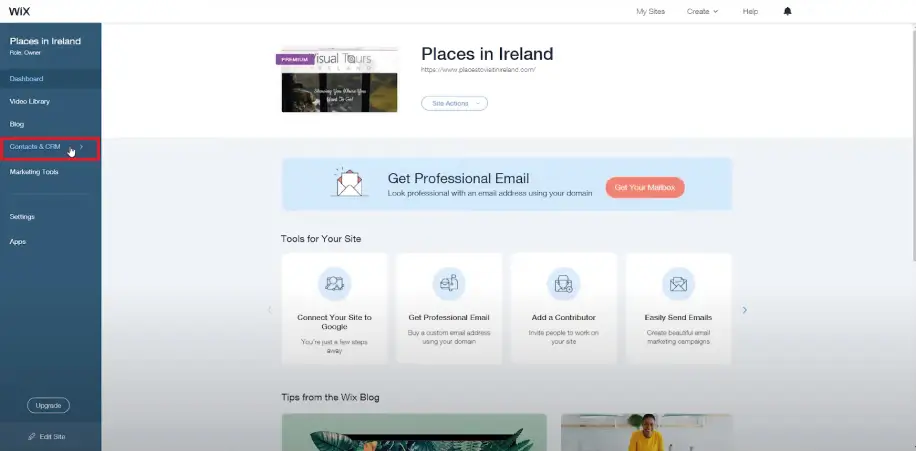
By clicking, features such as Inbox, Form Submissions, Invoices and some others can be found here. You will also find Contact List, which is the feature we’ll need today.
Once Contact List is selected, you will find the list of contacts on your site that have already been added. If no contacts have been added, you should just see your own account within the contact list.
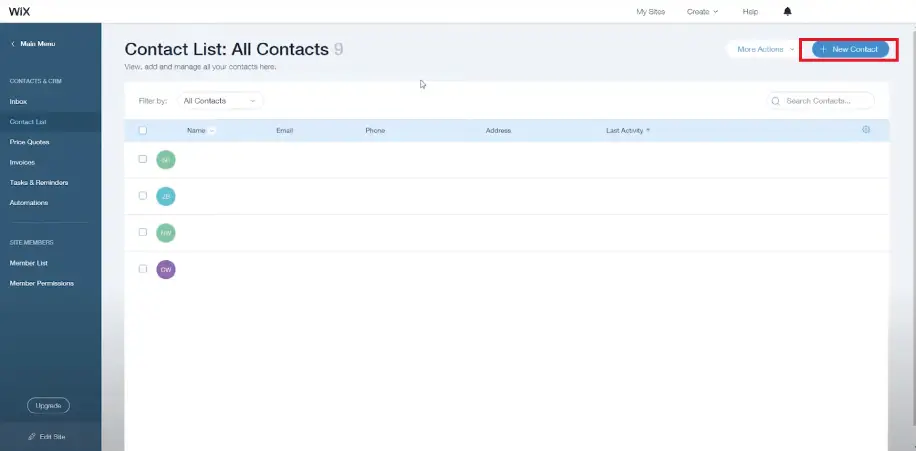
The next step to manually add a contact is to click on the ‘New Contact’ button at the top right of the dashboard. This is circled in red in the above screenshot. A pop-up box should appear, and this is where you can add a new contact.
Fields already included within the pop-up box include:
- Name,
- Email,
- Phone and Address.
There is also the option to add a custom field to the contact.
Additional fields are ideal for company contacts as you can add fields for:
- A contact’s position,
- Their company,
- Website,
- Addresses.
To add a new field to your contact, go to ‘Add New Field’ at the bottom left-hand corner of the pop-up box. Once you have filled in your client’s details, click Save.
Once saved, the contact should show automatically in your contact list.
Once a contact is added, you can click on the contact within the list, and a right sidebar will appear. Within this side-bar you can:
- Edit the contact,
- Add notes about the contact,
- Add attachments to the contact,
- Add tasks and reminders for this contact.
How to Import Contacts Directly from Gmail
Connecting and importing contacts from Gmail to WIX is a straightforward process that seamlessly integrates your email contacts into your website. When you follow the steps to add contacts in WIX and Mailchimp, you’ll notice that adding Gmail contacts is just as simple.
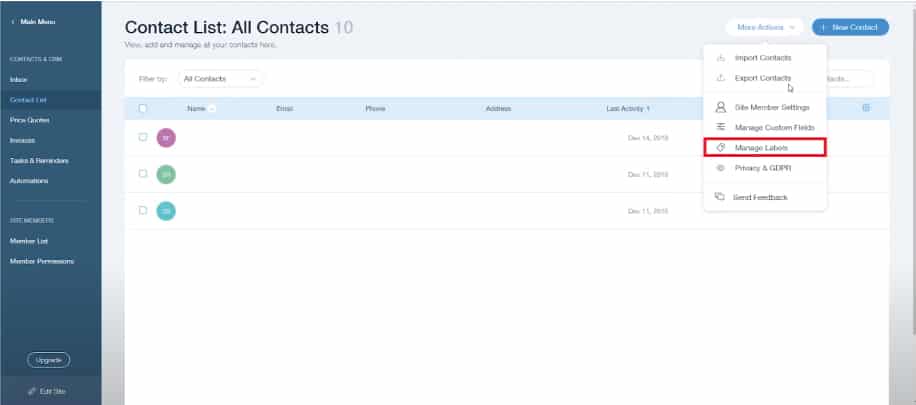
Beside the “Add Contact” button, as shown in the screenshot above, there is a “More Actions” drop-down menu. This drop-down menu provides additional features to enhance your contact management experience. Some of the notable features include:
- Manage Custom Fields: This feature allows you to customize fields to gather specific information from your contacts.
- Privacy & GDPR: Ensures that your contact management complies with privacy regulations, such as GDPR.
- Manage Labels: Helps you categorize and organize your contacts for more efficient communication.
- Import Contacts: This is where you can initiate the contact importing process.
When you choose to import contacts, you are presented with two options:
- Import from Gmail: This option simplifies the process by connecting directly to your Gmail account.
- Import using a CSV file: If you have contact data stored in a CSV file, you can use this option to upload it.
By selecting the “Import from Gmail” option, you will be redirected to your Google accounts. Here, you can choose the Google account that holds your contacts, whether it’s for your business or personal use. To proceed, allow the necessary permissions for WIX to access your Gmail contacts.
A pop-up window will display the number of Gmail contacts available and allow you to specify how many you want to add to your WIX account. Additionally, you have the option to designate these contacts as subscribers, which means they will receive marketing communications from your site. It’s important to note that proper consent from your contacts is required for this. When you’re ready to add your contacts, simply click “Import” to complete the process. Be cautious, as this action imports all your Gmail contacts.
It’s worth mentioning that each WIX site can accommodate up to 200,000 contacts, ensuring that you have the capacity to manage and engage with a substantial audience effectively. This integration of WIX and Mailchimp simplifies the process of connecting with your Gmail contacts, making it easier to reach and engage with your audience.
How to Import a Group of Contacts from Your Email
If you wish to import a group of contacts, you will need to export your contacts as a CSV file and then import this file to your WIX site.
To do this, you will need to export the contacts from your Gmail.
This also works with other email hosts such as Yahoo and Outlook. When doing this, make sure every contact has at least one of the following: a phone number, address, or email. Otherwise, it will not export.
The first step to exporting the contacts you want is to go to your contacts on your Gmail. To do so, click the Google Apps drop-down in the top right corner of your email. Find the contacts app and click. It will bring you to your list of contacts.
It may not show contacts depending on if you have your phone contacts linked up with your account.
Next, whilst in the contacts menu, click on the More drop-down. You will find it in the top left corner.
In the drop-down menu you’ll find when connecting WIX and Mailchimp, you have several valuable options to enhance your contact management experience. Here’s an elaboration of each of these options:
- Import: This option is particularly useful when you want to bring contacts from external sources into your WIX and Mailchimp integration. You can import contacts from various platforms, including Gmail and CSV files, simplifying the process of expanding your contact list.
- Print: While many aspects of contact management have transitioned to the digital realm, there are still situations where having physical copies of your contact list can be helpful. The “Print” option allows you to generate hard copies of your contact list for reference or offline use.
- Restore: The “Restore” option is a valuable feature when you need to retrieve deleted contacts. It helps you recover contacts that may have been removed accidentally or are needed again for your communication efforts.
- Contacts: Clicking on “Contacts” provides you with access to your contact list, allowing you to view, edit, and manage your contacts efficiently. This central hub is where you can organize and maintain your contacts seamlessly.
- Others: The “Others” option typically encompasses various additional functions and settings related to contact management. This can include actions such as exporting contacts, setting contact preferences, and managing contact groups or labels. It’s a versatile category that addresses miscellaneous contact-related needs.
By integrating WIX and Mailchimp, you gain access to these options within the drop-down menu. This integration streamlines your contact management process, enabling you to import, organize, and engage with your contacts more effectively. Whether you’re importing contacts from different sources, printing contact lists, or performing other contact-related tasks, this feature-rich integration enhances your ability to connect with your audience and build meaningful relationships.
You will also find Export. Click on export, and a popup box will appear.

Once using the popup box, you can choose which contacts to export. There are three options which include:
- The Group,
- Selected Contacts,
- All Contacts.
You want to choose The Group. This has a drop-down itself, showing all the groups you’ve created.
Choose the group you wish to export.
You can also choose which file format to export your contacts in. The one you want is the Google CSV format. Click export, and the list will start to download.
To import the file, complete the same steps as before but instead of choosing a Gmail account to import your contacts, select the CSV file. Click upload and find the right document within your device’s documents and open it.
Click Import, and there we have it. The contacts have been added.
If you want to make sure the right contacts are being imported by the CSV file, it can also be opened in Microsoft Excel.
What are the Contact Labels on Your WIX Website?
Once you have your contacts imported into your WIX website, there’re many features that you can take advantage of.
This includes:
- Attachments,
- Notes,
- Tasks
- Reminders,
- Labels.
So, what are WIX labels used for?
Labels make for a great feature and tool within the contacts in WIX. They allow you to:
- Group different contacts,
- Filter your contact list,
- Send emails to multiple clients at once
- And more.
To access the labels, complete the steps as before. Go to your WIX dashboard, then Contacts & CRM and click Contact List. Here you will see all your contacts once again.
To access the labels, click on the more actions dropdown at the top right of the page and go to manage labels. Here in the managed labels, you can add, delete and edit all your labels. Name your labels in categories that are relevant to you, such as customers and new clients.
Once created, click done and add to all relevant contacts.
WIX comes with pre-set labels such as customers. When a customer makes a purchase on your site, their details are automatically added to the customer label. There are also:
- Members,
- Subscribers,
- Member requests
- And many more.
Forms add visitors to the “contacted me” label.
All the labels help filter contacts. For example, you might need to easily find a contact that has completed a form on your site. Filter the contacts using the appropriate label. Depending on your site, this will save you a lot of time and money.
For more articles on Wix – check out these links:
Top 4 Best Wix Apps to Connect with Visitors
Top 4 Best Wix Apps to Design a Perfect Looking Website
Top 6 Best Wix Apps for Lead Generation
Top 4 Best Wix Apps for eCommerce
Top 4 Best Wix Apps to Make Your Wix Content Pop
 ProfileTree


 Noha Basiony // 29th January 2024