Automation and Automated Emails in Wix offer valuable tools to enhance your website’s functionality and user engagement. Here’s an elaboration on how to set up automation in Wix and why it’s crucial:
Automation and Automated Emails in Wix: Enhancing User Engagement
Automated emails can play a pivotal role in your website’s success. They serve as cost-effective tools to boost user engagement, keep visitors informed, and actively involve them in your site’s activities. Wix provides a user-friendly platform to set up various automated actions, including sending emails, email notifications, or direct messages through Wix Chat. These actions can be customized to align with your specific needs and preferences, ensuring a tailored user experience.
Key Benefits of Automation in Wix:
- Efficiency: Automation eliminates the need for manual, time-consuming tasks. You can set up actions to occur automatically based on predefined triggers or schedules, saving you valuable time and effort.
- Engagement: Automated emails and notifications help maintain user engagement by delivering timely and relevant content. For example, you can send a welcome email immediately after a user subscribes to your newsletter or trigger notifications when users interact with specific site features.
- Personalization: Wix allows you to customize automated actions to deliver a personalized experience to your audience. You can set up actions based on user behaviour, preferences, or past interactions, increasing the chances of meaningful engagement.
- Scheduled Actions: Automation in Wix offers the flexibility of scheduling actions for specific times or events. Whether it’s sending out newsletters at regular intervals or notifying users about upcoming events, you have control over when these actions take place.
- Streamlined Communication: Through automated emails and notifications, you can maintain consistent and efficient communication with your site’s visitors and subscribers. This can include updates, promotions, or relevant content delivery.
- User Involvement: Direct messages via Wix Chat can encourage user involvement and interaction. Whether it’s providing support, answering queries, or offering assistance, real-time communication enhances the user experience.
Setting Up Automation in Wix:
To make the most of automation and automated emails in Wix, follow these general steps:
- Access the Wix Dashboard: Log in to your Wix account and access your site’s dashboard.
- Choose an Automation Tool: Wix offers various tools for automation, including Wix Email Marketing, which allows you to set up email campaigns and triggers.
- Design Automated Actions: Within the chosen automation tool, design the actions you want to automate. This may include creating email templates, defining notification criteria, or setting up direct message responses.
- Define Triggers: Specify the conditions or events that will trigger the automated actions. For instance, you can set triggers for user sign-ups, abandoned carts, or event registrations.
- Customize Settings: Customize the settings for each action, such as the timing, recipient criteria, and content. Ensure that your automated messages align with your branding and messaging strategy.
- Test and Preview: Before activating automation, use testing and preview features to ensure that the automated actions function as intended and appear correctly to recipients.
- Activate Automation: Once satisfied with your setup, activate automation to start delivering automated emails, notifications, or chat messages to your site’s users.
By effectively leveraging automation and automated emails in Wix, you can enhance user engagement, provide a personalized experience, and efficiently manage communication with your audience, ultimately contributing to the success of your website.
Table of Contents
The Basic Steps to Setup automation and automated emails in WIX
- Create a Wix Account:
- Visit the Wix website and sign up for an account if you don’t already have one. Choose a plan that suits your needs; Wix offers both free and premium plans.
- Choose an Email Marketing Tool:
- Wix provides its own integrated email marketing tool called Wix Email Marketing. To access it, go to your Wix dashboard, click on “Marketing & SEO” in the left sidebar, and select “Email Marketing.” Alternatively, if you prefer third-party options like Mailchimp or SendinBlue, you can integrate them into your Wix website through the Wix App Market.
- Design Your Email:
- Once you’re in your chosen email marketing tool, you can start designing your automated email. Many tools offer a user-friendly, drag-and-drop editor that allows you to create visually appealing emails. You can select from pre-designed templates or build a custom email that aligns with your brand’s look and feel.
- Define Your Automation Trigger:
- Decide what user action or event will trigger the automated email. For example:
- Subscription Trigger: Send a welcome email immediately after a user subscribes to your newsletter.
- Abandoned Cart Trigger: Automatically send a reminder email when a user leaves items in their shopping cart without completing the purchase.
- Anniversaries Trigger: Set up emails to be sent on specific dates, such as birthdays or membership anniversaries.
- Lead Nurturing Trigger: Follow up with leads automatically after they download a resource or sign up for a webinar.
- Decide what user action or event will trigger the automated email. For example:
- Set Up Automation Rules:
- Configure the rules that govern when and to whom the automated email should be sent. For instance:
- Determine the delay between the trigger event and email delivery.
- Specify the conditions for sending the email, such as targeting users who haven’t made a purchase within a certain timeframe.
- Create if-then rules, where certain actions trigger specific follow-up emails.
- Configure the rules that govern when and to whom the automated email should be sent. For instance:
- Personalise Content:
- Make your automated emails more engaging by personalising the content. Most email marketing tools allow you to use merge tags or placeholders to address recipients by their names. You can also tailor the email’s message based on the recipient’s interests or previous interactions with your site.
- Test and Preview:
- Before launching your automated email, use the testing and preview features offered by your email marketing tool. This allows you to see how the email will appear to recipients and how it functions across various devices and email clients.
- Activate Automation:
- Once you’re satisfied with the automated email’s design and settings, activate the automation. It will now run based on the trigger and rules you’ve defined. The email marketing tool will automatically send emails to users who meet the specified criteria.
- Monitor and Analyse:
- After activation, regularly monitor the performance of your automated email campaigns. Track important metrics like open rates, click-through rates, and conversion rates. These metrics provide insights into the effectiveness of your emails and help you make data-driven decisions.
- Optimise Over Time:
- Continuously optimise your automated email campaigns. Experiment with different elements, such as subject lines, email content, and send times. A/B testing can help you identify which variations yield the best results.
- Compliance with Regulations:
- Ensure that your automated email campaigns comply with email marketing regulations, such as GDPR (General Data Protection Regulation) and CAN-SPAM Act (Controlling the Assault of Non-Solicited Pornography And Marketing Act). Provide clear options for subscribers to opt in or opt out, and include essential information, such as your business’s physical address.
- Segment Your Audience:
- To increase the relevance and effectiveness of your automated emails, segment your audience. Divide your subscribers into groups based on their preferences, behaviors, demographics, or purchase history. This allows you to send targeted messages that resonate with each segment.
The first step is to sign into your WIX dashboard. To the left of the dashboard there are many features such as a blog and video library. There is also a feature called Contacts & CRM. Click on this feature and you will be brought to a new tab.
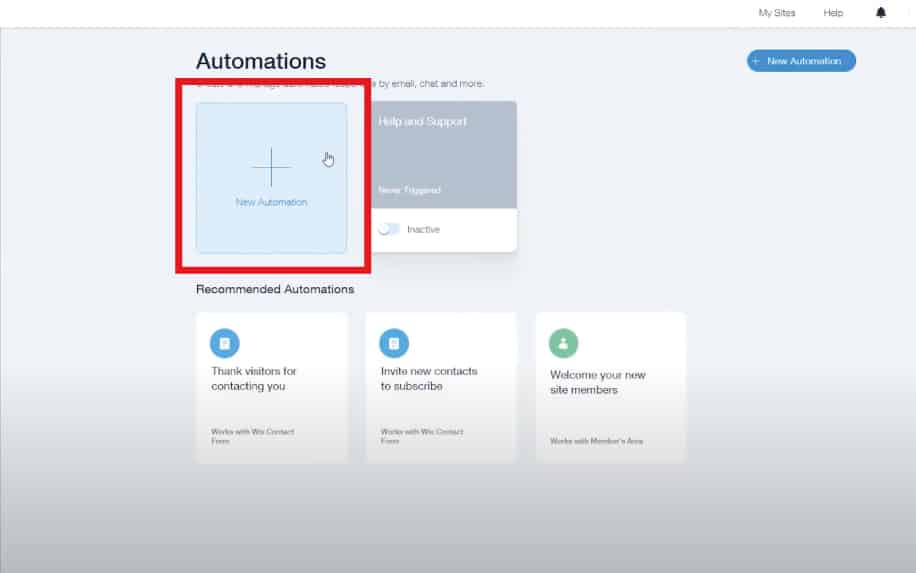
In the left hand side a range of new options will appear including the automations feature.
You will be brought to a new tab, where you can Create a New Automation and see all of the automations that have been created. WIX will also recommend different automations for you, based on your goals for your site.
To create a new automation, click the Add New Automation button shown in the centre or top right of the tab.
Now you can start to create a new automation. setup automated emails by editing the name of the automation with the pencil setting towards the right of the automation setup. Name the automation appropriately so that you can always find it easily.
The next step is to select a trigger from the drop-down list and choose the most relevant trigger for you.
You will also need to do the same for the action and the time of the automation. The action is a response to the trigger. For example, you could set up the following automating:
- Trigger – A user signs up to your mailing list,
- Time – Wait 30 minutes,
- Action – Send out Welcome email.
Note that the more apps on your site the more triggers there will be. For instance if you have two apps for creating forms on your site, it may show two different triggers. You’ll also get additional triggers and actions for other apps and plugins that you add to your site.
.
After you choose an action you can customise it to suit you. If you choose to send an email, you can set up the email in the action section. Remember to test and preview the email.
How to Send Automated Emails Using WIX
On WIX you can set up automated email responses whenever a user completes a trigger action on your site. In the video below it will show you how to do this. This feature is perfect as it allows you to actively engage with users easily whenever you setup automated emails.
To get started sending automated emails, you will first need to access your WIX automations. To do this head to the WIX dashboard, then navigate to the Contacts and CRM feature. This will open a new tab with the feature automations.
Click here and it will allow you to add automations to your WIX site. To do this, use the following steps:
- Go to your WIX Dashboard,
- Select Contacts & CRM,
- Choose Automations,
- Click Add New Automation.
To add a new email automation, click on the add new automation button on the new tab. This will take you to the tab to enter a new automation. Rename the automation appropriately using the pencil.
You should see three drop-downs, this is where to add an automation.
On the Trigger drop-down select the ‘Submit a Contact Form’ trigger. This means the automation will be connected to a form and when a user submits a form, they will receive this response we’re setting up.
On the Action drop-down select ‘Send Email to Visitors’ option. Here you will be able to customise an automated email that will be sent to everyone who submits a form.
This customisation works exactly like the WIX Editor. You can also choose between sending the email once or multiple times each time the user contacts you through this form.
Next, confirm the name and the email of the sender. This should be an email that you already have connected to your account. A confirmation code will be sent to the email to confirm the setup.
Once the setup is complete, click activate in the top right corner of the screen and the automated emails should be ready to go.
Triggers and Actions: How to Use Automated Emails in WIX
Now that you understand how to set up an email automation in WIX, it’s important that you understand how to use them to the full effect. Recall that there are two key components to a WIX automation.
These are:
- Triggers – The action a user performs, which sets off an automation,
- Actions – What happens after a user sets off the trigger.
These are the levers you can pull on to create effective automated email campaigns. We already took the example of using automations to set up a welcome email when users sign up to your mailing lists.
Other common triggers include:
Triggers: Initiating the Automation
- Triggers are the catalysts that kickstart an automated email campaign. They are user actions or specific events on your website that prompt Wix to send out automated emails, helping you set up automated emails effectively. Understanding and strategically utilizing triggers is crucial for creating impactful automated email campaigns. Here are some common triggers and how you can leverage them to set up automated emails:
- Sign-Ups and Subscriptions: When a user signs up for your newsletter or subscribes to updates, this action can trigger a welcome email. This initial interaction sets the stage for building a positive user relationship right from the start and is an essential part of how to set up automated emails.
- Purchases: E-commerce websites often use purchase triggers to set up automated emails, such as order confirmations, shipping updates, and post-purchase recommendations. These emails aim to enhance the customer experience and potentially drive additional sales and are a key part of how to set up automated emails effectively.
- Cart Abandonments: If a user adds items to their cart but doesn’t complete the purchase, this trigger can prompt an automated email with a reminder about the abandoned items. Offering incentives or discounts in these emails can encourage users to finalize their purchase, demonstrating the power of how to set up automated emails.
- Returns and Refunds: After a user initiates a return or refund request, an automated email can confirm the request’s receipt and provide information on the return process. This helps streamline customer support and keeps users informed, showcasing the importance of how to set up automated emails.
- Customer Service Interactions: Following a customer service interaction, such as a support ticket submission or live chat conversation, automated emails can be used to provide follow-up information or request feedback. These emails demonstrate your commitment to customer satisfaction and are a fundamental part of how to set up automated emails.
- Non-Transactional Site Visits: When users visit your site without making a purchase or other transaction, you can trigger automated emails to re-engage them. These emails may showcase new products, blog posts, or special offers to entice return visits and are a valuable aspect of how to set up automated emails effectively.
- Referrals: If your website has a referral program, referrals made by users can trigger automated emails to reward them or acknowledge their referrals. This encourages users to refer more people to your site and illustrates the impact of how to set up automated emails.
- Time-Based Triggers: Setting time-based triggers can be a powerful way to re-engage users who haven’t visited your site in a while. Automated re-engagement emails can remind them of your products or services, demonstrating the versatility of how to set up automated emails.
- Actions: Crafting the Perfect Email Response for Setting Up Automated Emails
- Actions are the follow-up responses to triggers, and they are what give your automated emails their purpose and impact when you set up automated emails. Crafting the perfect email for each trigger is essential for achieving the desired outcomes when you set up automated emails. Here are some tips on aligning actions with triggers when you set up automated emails:
- Welcome Emails: For sign-ups and subscriptions, the action is often a warm welcome email when you set up automated emails. It should introduce your brand, provide valuable information, and set expectations for future communications as part of setting up automated emails.
- Purchase Confirmations: After a purchase, send confirmation emails that include order details, estimated delivery times, and contact information for customer support. These emails build trust and reassure customers, highlighting the importance of how to set up automated emails.
- Cart Abandonment Reminders: To recover potentially lost sales, cart abandonment emails can include images of abandoned items, persuasive product descriptions, and incentives like discounts or free shipping when you set up automated emails.
- Return and Refund Updates: Keep customers informed about the progress of their return or refund requests when you set up automated emails. Include instructions, timelines, and contact details for further assistance as part of setting up automated emails.
- Customer Service Follow-Ups: After a customer service interaction, send a follow-up email to gauge customer satisfaction when you set up automated emails. Include a brief survey or request for feedback to improve your services, demonstrating the effectiveness of how to set up automated emails.
- Re-Engagement Emails: For users who haven’t visited your site in a while, re-engagement emails can feature personalized recommendations, exclusive offers, or updates on what they’ve missed as part of how to set up automated emails effectively.
- Referral Rewards: When users refer others to your site, automated emails can deliver rewards or incentives promptly when you set up automated emails. Express gratitude for their referrals and encourage further sharing, showcasing the benefits of how to set up automated emails.
- Time-Based Re-Engagement: Time-triggered emails can gently remind inactive users about your site’s offerings when you set up automated emails. Highlight new content, products, or promotions to reignite their interest, emphasizing the versatility of how to set up automated emails.
The key to achieving ROI on your email automation is learning to use each of these as an opportunity to make sales or develop your customer relationships. To do this, it’s important to craft the perfect email as the corresponding action for each trigger.
One way to do this is by using related products as upselling opportunities for triggers like purchases and non-transactional visits. Alternatively, it’s common to offer discounts in the event of returns, cart abandonments and referrals.
 ProfileTree

 Eman Sameh // 11th February 2024
 Noha Basiony // 29th January 2024